Maple Pumpkin Poptarts-Homemade Fall Treat
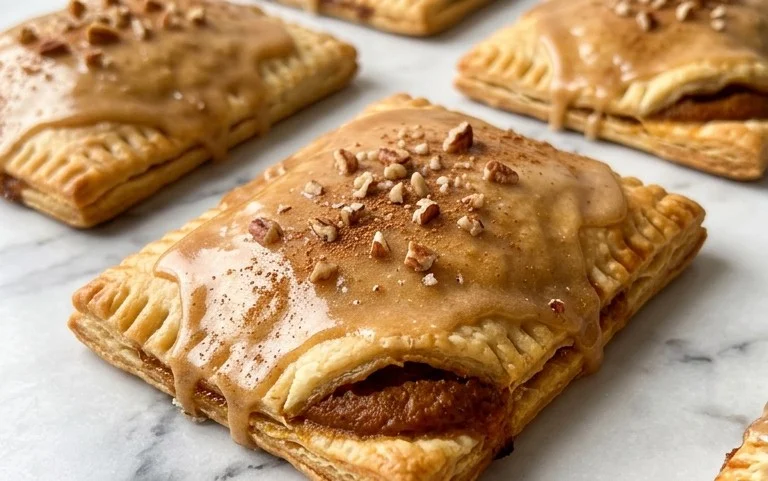
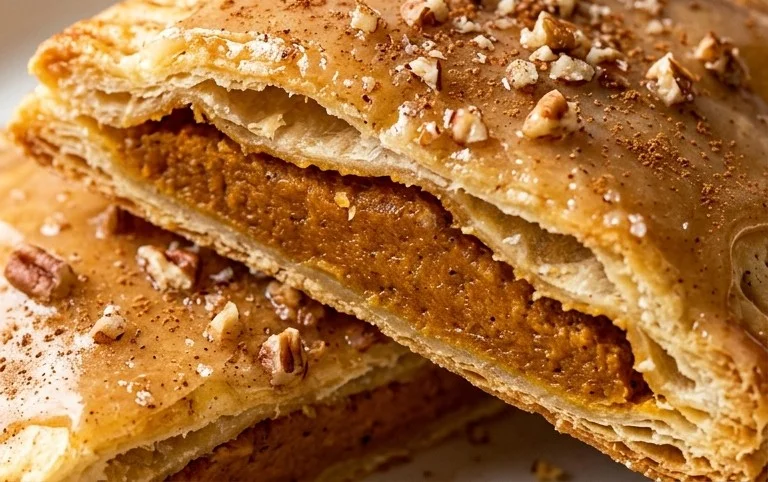
Maple-Glazed Pumpkin Poptarts are a delightful twist on a beloved classic, bringing the cozy flavors of autumn right into your kitchen. Who doesn’t adore the flaky, buttery pastry and sweet, fruity filling of a Poptart? But when you infuse that magic with the warm, comforting essence of pumpkin and a rich, irresistible maple glaze, you elevate it to a whole new level of deliciousness. These aren’t just any Poptarts; they’re a celebration of the season, a homemade hug in every bite. The vibrant orange hue of the pumpkin filling, perfectly complemented by the golden pastry and the glistening maple topping, makes these Maple-Glazed Pumpkin Poptarts a truly special treat that will have everyone asking for seconds. Get ready to experience autumn in its most delicious, portable form!
Maple-Glazed Pumpkin Poptarts
Move over, store-bought! These homemade Maple-Glazed Pumpkin Poptarts are about to become your new fall obsession. Imagine flaky, buttery pastry encasing a warm, spiced pumpkin filling, all drizzled with a sweet, maple-infused glaze. They’re the perfect blend of comforting and convenient, ideal for a quick breakfast, an afternoon treat, or even a festive dessert. While they might look fancy, they’re surprisingly simple to whip up, especially with the help of a store-bought pie crust. Get ready to fill your kitchen with the irresistible aroma of pumpkin and maple!
Ingredients:
- 1 refrigerated pie crust roll (found near the refrigerated biscuits)
- 1/2 cup canned pumpkin
- 1/3 cup brown sugar (packed)
- 1/2 tsp. maple flavoring
- 1/4 tsp. pumpkin pie spice
- dash of salt
- 1/2 cup powdered sugar
- 1/4 tsp. maple flavoring
- 1 Tbsp. milk
Instructions:
Preparing the Pumpkin Filling
The heart of our Poptarts lies in this delicious pumpkin filling. It’s a simple mix that packs a ton of flavor. First, grab a medium-sized bowl. Add the 1/2 cup of canned pumpkin. Make sure you’re using 100% pure pumpkin puree, not pumpkin pie filling, as we want to control our spice and sugar levels. Next, measure out 1/3 cup of brown sugar, making sure to pack it down into the measuring cup. This helps ensure you get the right amount of sweetness. Add the brown sugar to the bowl with the pumpkin. Now, for that quintessential fall flavor, add 1/2 teaspoon of maple flavoring. This is separate from the glaze and adds a subtle depth to the filling itself. Follow this with 1/4 teaspoon of pumpkin pie spice. If you don’t have pumpkin pie spice on hand, you can create your own blend with cinnamon, nutmeg, ginger, and cloves. Finally, a tiny dash of salt will help to balance out the sweetness and enhance all the other flavors. Using a spoon or a spatula, stir all these ingredients together until they are thoroughly combined and you have a smooth, consistent filling. Set this aside for now while we prepare the pastry.
Assembling the Poptarts
This is where the magic starts to happen! You’ll want to preheat your oven to 375°F (190°C). While the oven is heating, unroll your refrigerated pie crust onto a lightly floured surface. Gently unroll the dough, being careful not to tear it. If it’s a bit sticky, a little extra flour on your hands and the surface will help. Use a sharp knife or a pizza cutter to cut the pie crust into four equal rectangles. You can measure them to be precise, or just eyeball it for a more rustic look.
Now, take about half of your prepared pumpkin filling and spoon it onto one half of each of the pie crust rectangles, leaving a small border around the edges. Be sure not to overfill, or the filling might ooze out too much during baking. Aim for a relatively even layer. Once you have filled four of the rectangles, take the remaining four rectangles of pie crust and place them on top of the filled ones, creating little pastry pockets. Gently press down on the edges of each Poptart with your fingers to seal them shut. This is crucial to keep the delicious filling inside. You can also use the tines of a fork to crimp the edges for an extra-secure seal and a decorative touch.
Baking to Golden Perfection
Now it’s time to get these beauties into the oven. Carefully transfer your assembled Poptarts onto a baking sheet lined with parchment paper. The parchment paper is a lifesaver for easy cleanup! Once your oven has reached the correct temperature of 375°F (190°C), place the baking sheet in the oven. Bake for approximately 15-20 minutes, or until the pastry is golden brown and puffed up, and the edges are nicely crisp. Keep an eye on them during the last few minutes of baking, as ovens can vary. You want them golden, not burnt! Once they are perfectly baked, carefully remove the baking sheet from the oven and let the Poptarts cool on the sheet for a few minutes before transferring them to a wire rack to cool completely. This step is important because if you try to glaze them while they are still piping hot, the glaze will just melt and run off.
Crafting the Maple Glaze
While our Poptarts are cooling, we’ll whip up the irresistible maple glaze. In a small bowl, combine 1/2 cup of powdered sugar. This is the base for our sweet topping. Add another 1/4 teaspoon of maple flavoring. This is where the strong maple flavor comes in, so don’t skip it! Gradually add 1 tablespoon of milk, stirring continuously. You might need to add a tiny bit more milk or powdered sugar to achieve your desired consistency. You’re looking for a thick but pourable glaze – not too thin that it runs everywhere, and not too thick that it’s difficult to spread. Whisk until the glaze is smooth and lump-free.
Glazing and Enjoying
Once the Poptarts have cooled to room temperature, it’s time for the grand finale: the glaze! Using a spoon or a small offset spatula, drizzle the maple glaze generously over the top of each Poptart. You can create intricate patterns or just give them a good, rustic coating. If you’re feeling extra festive, you can even sprinkle a few extra dashes of pumpkin pie spice or some decorative edible sprinkles on top while the glaze is still wet. Let the glaze set for about 10-15 minutes before digging in. And there you have it – your very own homemade Maple-Glazed Pumpkin Poptarts! They’re best enjoyed fresh, but they can be stored in an airtight container at room temperature for a day or two. Enjoy every delicious, flaky bite!
Conclusion:
I hope you’re as excited as I am to try these incredible Maple-Glazed Pumpkin Poptarts! This recipe is a true celebration of fall flavors, combining the comforting warmth of pumpkin with the sweet, rich embrace of maple glaze. The flaky, buttery pastry perfectly complements the spiced pumpkin filling, creating a delightful handheld treat that’s far superior to any store-bought version. These poptarts are fantastic for a special weekend breakfast, a delightful afternoon snack, or even a sweet dessert. I love serving them warm, perhaps with a dollop of whipped cream or a side of vanilla ice cream for an extra decadent experience. For variations, consider adding a pinch of nutmeg or cardamom to the filling for more spice, or sprinkling chopped pecans onto the glaze before it sets for a delightful crunch.
Don’t be intimidated by making your own poptarts; the process is quite rewarding, and the results are absolutely worth it. I truly encourage you to give this Maple-Glazed Pumpkin Poptart recipe a try. Gather your ingredients, put on some cozy music, and enjoy the process of creating something truly special!
Frequently Asked Questions:
Can I make the poptart filling ahead of time?
Absolutely! You can prepare the pumpkin filling a day or two in advance and store it in an airtight container in the refrigerator. This can save you some time on the day you plan to assemble and bake your poptarts.
What kind of pastry dough should I use?
For the best texture and flavor, I highly recommend using a good quality store-bought puff pastry or a homemade pie crust recipe. Both will provide that essential flaky, buttery base that makes these poptarts so irresistible.
How should I store leftover poptarts?
Once completely cooled, store your Maple-Glazed Pumpkin Poptarts in an airtight container at room temperature for up to 2-3 days. If you prefer them warm, you can gently reheat them in a toaster oven or a low oven for a few minutes.
Maple-Glazed Pumpkin Poptarts
Homemade poptarts with a sweet pumpkin filling and a maple glaze, inspired by the flavors of autumn.
Ingredients
-
1 refrigerated pie crust roll
-
1/2 cup canned pumpkin
-
1/3 cup brown sugar (packed)
-
1/2 tsp. maple flavoring
-
1/4 tsp. pumpkin pie spice
-
dash of salt
-
1/2 cup powdered sugar
-
1/4 tsp. maple flavoring
-
1 Tbsp. milk
Instructions
-
Step 1
Preheat oven to 375°F (190°C). Line a baking sheet with parchment paper. -
Step 2
In a medium bowl, combine canned pumpkin, brown sugar, 1/2 tsp. maple flavoring, pumpkin pie spice, and salt. Stir until well combined. -
Step 3
Unroll the pie crust and cut it into 4 equal rectangles. Divide each rectangle in half to create 8 smaller rectangles. -
Step 4
Spoon about 1 tablespoon of the pumpkin filling onto one half of each pastry rectangle, leaving a small border. Fold the other half of the pastry over the filling and press the edges together with a fork to seal. -
Step 5
Place the sealed poptarts onto the prepared baking sheet. Bake for 15 minutes, or until golden brown. -
Step 6
While the poptarts are baking, prepare the glaze. In a small bowl, whisk together powdered sugar, 1/4 tsp. maple flavoring, and milk until smooth. -
Step 7
Once the poptarts have cooled slightly, drizzle the maple glaze over the tops.
Important Information
Nutrition Facts (Per Serving)
It is important to consider this information as approximate and not to use it as definitive health advice.
Allergy Information
Please check ingredients for potential allergens and consult a health professional if in doubt.